
It was both exciting and slightly daunting returning to the construction site after a well deserved 3 weeks off over Xmas. We were due to restart on 12th of January… although I still hadn’t locked anybody in to help me as the two carpenters I was speaking with were both being non committal – by the 7th of January both had given me a definitive no, as they had picked up bigger jobs… it wasn’t ideal, but things happen for a reason.
I decided to put the floor framing out to tender on serviceseeking.com.au – as a labour only, quick turn around job. Our daughter was due to be born on the 17th of Jan, so I didn’t have much time to get organised… 😉


I bought the timber and simultaneously interviewed a bunch of potential builders. One instantly stood out and was ready to start. 
The site was looking nice and clean and ready to roll for 2014 – luckily our daughter was politely late

Harry and the boys got stuck into it – I gave them a quick run down of what’s what and warned them that I may need to disappear at any minute. 
As it turned out, I spent a day on site before Jose went into labour…. 
Harry supervising… I needed to go…. 
By the time I returned 5 days later, not only was I a father, but the floor framing was done!!

I managed to narrow down my search for a builder/carpenter to take on the next phase, and had Steve locked in to start the following week… in the meantime I called Simon in to tackle the back wall. 
We got stuck into it and within 3 days managed to cart 30-40 wheel barrows of bricks and sand from the back of the property to the front and load them onto trucks – a mission and a half, but a good feeling to have it done!


We deciphered the engineering drawings and managed to build the required trench and reinforcements for the footings. 
Keeping the concrete industry alive! 

One fence footing done!

Simon took off for another job, whilst I got stuck into building the back wall. 
Taking delivery of the flooring – we’ve been getting pretty creative with unloading.

Flooring ready to go.

Next it was my time to get the 9metre long steel beam in – I measured and specified this myself – drew it up in 3D and had it manufactured and hot dip galvanised = in short I was prepared for a disaster…

The guys at edcon managed to follow my drawings!

Steve instantly contributed his experience, and we slipped the truckie a six pack to get some more creative unloading going on.

Beam is half in… now to slide the remaining 5 metres in!

Steve knocked up some platforms that we installed on some hefty skateboards, and all 400 KGS of steel was suddenly gliding into the house (although it was far from being "in place")

The next day we hired a couple of genie lifts from kennards 
OK. so we have 400 kilograms of Steel suspended 3 metres in the air and we have to rotate it 90 degrees, lower it 700 mm and shift it 220 millimetres to the left – easy!! 
rotation complete!! 
You know things are getting tricky when old sailing ropes get introduced into the mix!

I’ve since found out, leaving more then 3mm tolerance is a GOOD idea – luckily all of the measurements were on the money!

Steel beam in place – seems trivial now, but felt like a huge milestone at the time –

the galvanising alone is a 3 week lead time, so if the beam didn’t fit, it would have seriously slowed us down! 
With the floors in place, Steve suggested we build the stairs.

Some crafty work…

And voila! 
meanwhile I tackled the remainder of the southern wall 
And Steve got the drop saw setup for building the remainder of the framework! 
Foam is up, now we just need to fill it with concrete without any explosions!! 
Puzzle ready to go…. 
and wall 1 is ready to go up 

View from the front 
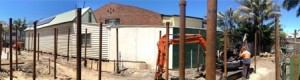
I managed to find another 4 tonnes of dirt out the back that I needed to get rid of.

More timber arrives 
lunching in style!

Parking a concrete boom pump in the house… 
and trying to reach the back wall 
A reducer, and an extension hose and we were there! 
… and the wall blew out… luckily I had my dad and Steve on hand to help brace it and we collectively managed to save the day! 
Everyone relieved that that was over!!

With the southern wall now full of concrete, we could install the beams. 
Window lintels and cross beams in place! 
I rang the boys form REES Electrical and they started roughing in power into the house…

Mains power ready to go.

Meanwhile Steve was cracking on upstairs… 
Reaching for the skies 
All happening – Tim Frawley plumbing on site with all of their kit, roughing in water and gas.

Lots of chasing going on. 
And Steve making good use of the dry weather! 
another $4000 of timber delivered – this time for the roof. 
Gas and water connected to the underground pipes we ran under the slab 4 months ago! 
First floor taking shape 
ready for the roof framing.

Internal walls all but done…


Happy with the day’s work! 
Some funky cantilevered string line placement for the ridge beam

A selfie…. delirium setting in! 
Production moves up a level 
starting to take shape! 
Gas for the fireplace going in 
and the sparkies are at it again! 

Managed to get a start on the roof…. just before… 
the rain…. nooooo!! 
Spot the leak 


and with everything progressing…. we had a site visit from the ladies of the house! 
Our daughter Indi, is already 2 months old… time is flying – she seems reasonably happy with her bedroom!

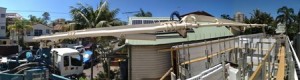
and as we go to press… the scaffolders are starting to put up scaffolding around the house – render, roof, gutters and more insulation!

love seeing this grow, and how quickly Indi has grown is amazing.
this whole blog site reminds me of how much one man can do. keep up the passion Gav, all the best.